Why Your Observatory Webcam Keeps Freezing at Night and How to Fix It
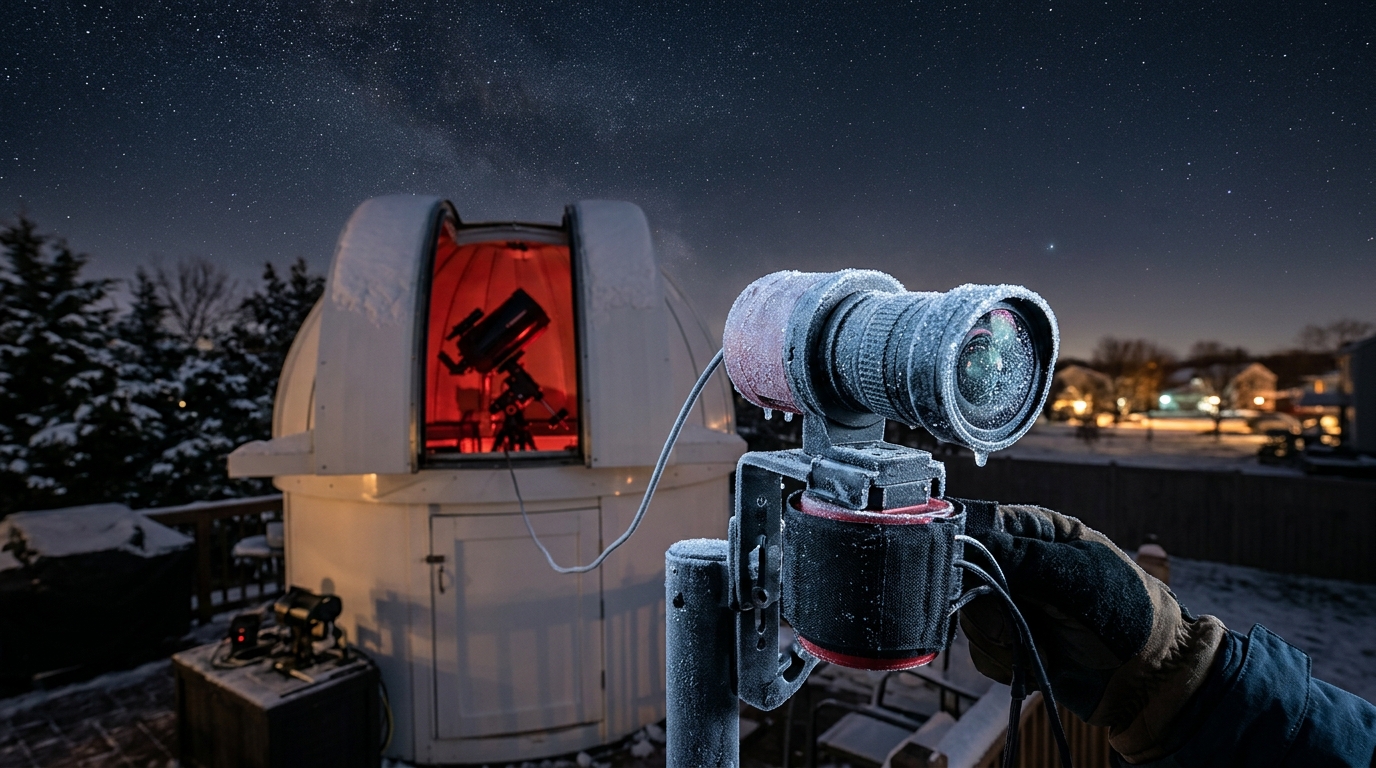
You check your observatory webcam feed at 2 AM, excited to review the night’s captures. The screen shows a frozen frame from three hours ago. Again.
This isn’t just annoying. It’s costing you valuable observation time and potentially missing once-in-a-lifetime celestial events. The good news? Most nighttime webcam failures stem from a handful of fixable issues that have nothing to do with your camera being defective.
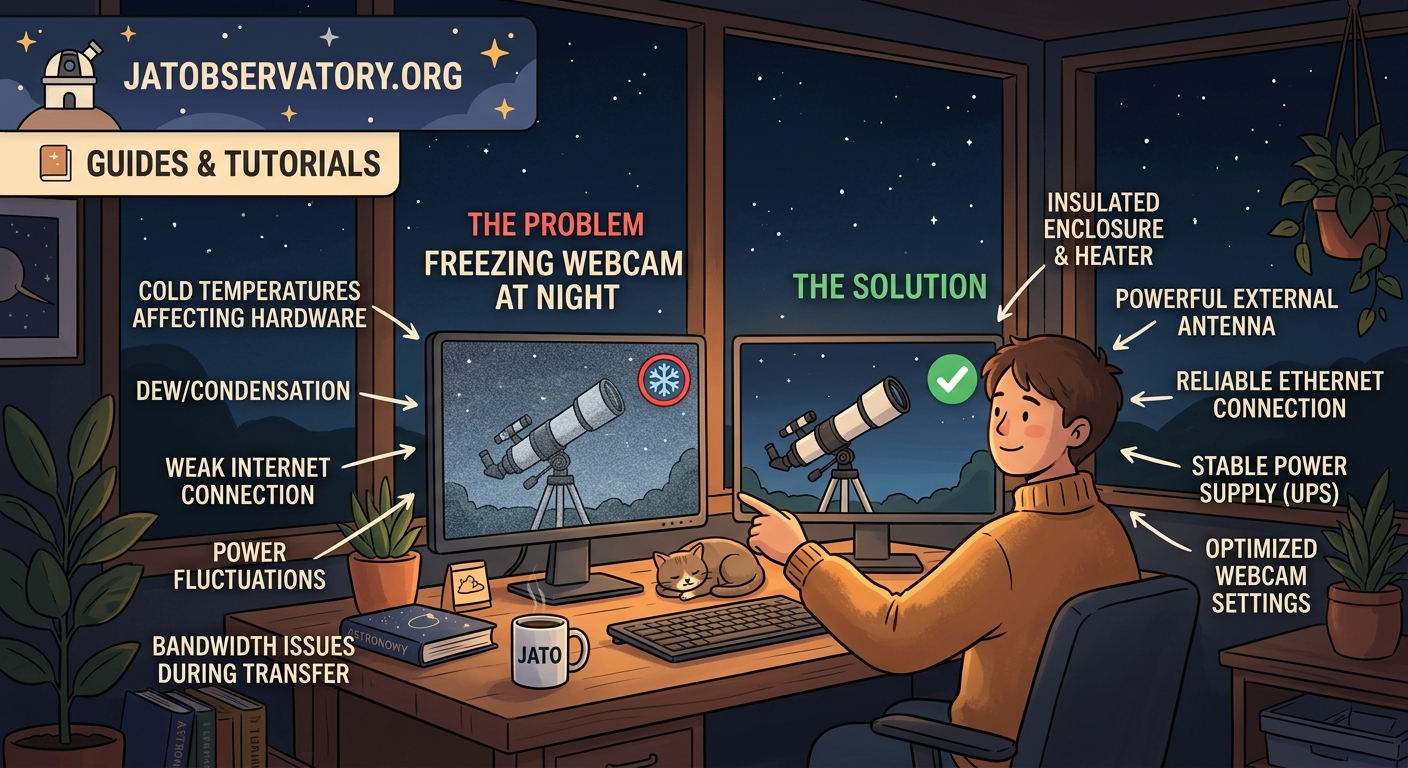
Observatory webcams freeze at night primarily due to temperature-related hardware stress, insufficient power delivery, network instability, and condensation on sensors. Most failures occur between midnight and 4 AM when temperatures drop fastest. Implementing proper heating elements, stable power supplies, network redundancy, and moisture control solves 90% of freezing issues without expensive equipment replacement.
Temperature Drops Are Killing Your Camera Hardware
Your webcam was designed for indoor use at room temperature. Observatory environments push equipment far beyond manufacturer specifications.
Most consumer webcams operate reliably between 32°F and 95°F. Outdoor observatories regularly see temperatures below 20°F during winter observation sessions.
Cold affects multiple components simultaneously. The image sensor becomes sluggish. Circuit boards contract. Solder joints develop micro-cracks. USB cables lose flexibility and internal connections weaken.
The freezing usually happens around the same temperature threshold each night. Pay attention to when your feed dies. Check your local weather data for that timeframe. You’ll likely see a pattern.
Common temperature-related symptoms:
- Feed works fine until 1-3 AM, then stops
- Camera responds to pings but sends no video data
- Physical disconnection/reconnection temporarily fixes the issue
- Problem worsens during clear nights (radiative cooling)
- Works perfectly during cloudy or warmer evenings
Power Supply Issues Multiply After Sunset
Your camera might be getting enough power during the day but starving at night. This sounds counterintuitive, but it’s extremely common.
Nighttime brings two power-related challenges. First, your camera’s infrared mode (if equipped) draws significantly more current than daytime operation. Second, cold temperatures increase electrical resistance in cables, reducing effective voltage delivery.
A camera rated for 500mA might pull 800mA when running IR illumination. If your power supply provides exactly 1A and you’re running a 20-foot USB cable, voltage drop can push your camera below minimum operating voltage.
“I spent two months troubleshooting network issues before realizing my powered USB hub was barely delivering 4.2V to the camera. Bumped it to a dedicated 5.2V supply and haven’t had a freeze since.” – Observatory operator, Colorado
Calculate Your Real Power Budget
- Check your camera’s actual power draw with a USB power meter
- Measure voltage at the camera end of your cable (not at the source)
- Add 30% overhead for cold weather operation
- Test during actual nighttime conditions, not during the day
USB cables longer than 10 feet need active power injection. Period. Passive cables simply cannot maintain proper voltage over distance, especially in cold conditions.
If you’re running building an all-sky camera system to monitor celestial patterns year-round, power planning becomes even more critical with multiple cameras sharing infrastructure.
Network Stability Collapses in Cold Weather
Your network equipment hates temperature swings as much as your camera does.
Outdoor ethernet cables, WiFi adapters, and switches all experience performance degradation below freezing. Packet loss increases. Latency spikes. Connections time out.
Many webcam applications interpret sustained packet loss as a camera failure and stop the stream. The camera itself might be working perfectly, but the data path has failed.
Test your network separately:
- Run continuous ping tests to your camera’s IP address
- Monitor for packet loss above 2%
- Check ping times (should stay under 10ms on local network)
- Test both during day and coldest part of night
- Document any correlation with temperature
WiFi connections are particularly vulnerable. The 2.4GHz band penetrates obstacles better but suffers more interference. The 5GHz band offers better throughput but has terrible range through walls and in cold air.
Hardwired ethernet connections fail too, just less frequently. Check your cable ratings. Cat5e works to about 15°F. Cat6 handles colder temperatures better due to thicker insulation.
Condensation Creates Invisible Failures

Moisture is the silent killer of observatory electronics.
As temperatures drop through the dew point, water condenses on every surface. Camera sensors, circuit boards, and cable connections all collect microscopic water droplets.
These droplets create electrical shorts, corrupt data signals, and physically damage components. The camera might appear to work normally, then suddenly freeze as condensation bridges critical circuits.
Condensation happens even inside sealed enclosures. Warm daytime air enters your camera housing. Night arrives, temperature drops, relative humidity skyrockets. Water appears.
| Prevention Method | Effectiveness | Cost | Difficulty |
|---|---|---|---|
| Desiccant packs | Low (saturates fast) | Very Low | Easy |
| Active heating element | High | Medium | Moderate |
| Sealed nitrogen purge | Very High | High | Difficult |
| Constant airflow with heater | High | Low | Easy |
The most reliable solution combines gentle heating with ventilation. A small 5W heating element keeps internal temperature 10-15°F above ambient. This prevents condensation without creating excessive temperature differentials.
USB Connection Reliability Plummets Overnight
USB was never designed for 24/7 outdoor operation. The protocol assumes stable, warm, indoor conditions with short cable runs.
Long USB cables in cold environments experience signal degradation. Data packets get corrupted. The host computer requests retransmission. After multiple failures, the USB controller gives up and resets the connection.
Your camera appears frozen, but it’s actually repeatedly connecting and disconnecting at the USB level. Most webcam software doesn’t handle this gracefully.
Symptoms of USB instability:
- Device appears in system manager but won’t stream
- “USB device not recognized” errors in logs
- Camera works immediately after physical reconnection
- Different USB ports show different reliability
- Problem correlates with cable temperature
Solutions range from simple to complex. Start with the easy fixes and work up.
- Shorten your USB cable to absolute minimum length needed
- Switch to active USB extension cables with built-in signal boosters
- Add a powered USB hub at the midpoint of long runs
- Consider USB-over-ethernet adapters for runs over 30 feet
- Upgrade to industrial-grade USB cameras with better cold tolerance
Many operators running how to choose the right all-sky camera for your backyard observatory find that purpose-built astronomy cameras handle temperature extremes far better than repurposed webcams.
Software Timeouts Need Adjustment for Cold Weather
Your webcam software expects consistent frame delivery. Cold weather slows everything down.
The camera takes slightly longer to process each frame. USB transmission slows due to increased cable resistance. Your computer’s USB controller becomes more conservative with timing.
Default timeout values assume ideal conditions. A 5-second timeout might be fine at 70°F but too aggressive at 20°F.
Check your capture software settings. Look for timeout values, retry attempts, and error handling behavior. Increase timeouts by 50-100% for winter operation.
Some software options handle poor conditions better than others. Applications designed for astronomy typically include more robust error recovery than consumer webcam programs.
Systematic Troubleshooting Saves Time and Frustration
Random fixes waste time. Systematic diagnosis solves problems permanently.
Follow this diagnostic sequence:
- Document exact failure time and conditions for three nights
- Check temperature correlation (install a logger if needed)
- Measure power delivery at camera during failure window
- Run network diagnostics during problem hours
- Inspect all physical connections for moisture or damage
- Test camera indoors at simulated outdoor temperatures
- Swap one component at a time to isolate failure point
Keep a log. Write down every change you make. Note the results. This data becomes invaluable when the problem shifts or returns.
Temperature logging costs almost nothing. A basic USB temperature sensor runs $15. Place it near your camera. Record data every 5 minutes. Compare failure times with temperature curves.
The pattern will become obvious. Failures at 28°F? Condensation. Failures at 15°F? Power delivery. Failures at random temperatures? Network issues.
Heating Solutions That Actually Work
Adding heat sounds simple. Implementation matters enormously.
Wrong heating approaches create new problems. Too much heat damages components. Uneven heating creates thermal stress. Constant cycling wastes power and shortens equipment life.
The goal isn’t to keep your camera warm. The goal is to keep it above critical thresholds for condensation and component operation.
Effective heating strategies:
- Resistive heating tape wrapped around camera body (not lens)
- Small PTC heating elements with thermostat control
- Heated enclosures with proper ventilation
- Waste heat from other electronics (USB hubs, computers)
- Insulation combined with minimal active heating
A 5-10W heater typically suffices for small webcams. Larger all-sky cameras might need 15-20W. Anything beyond that suggests poor insulation or excessive enclosure volume.
Thermostatic control is worth the extra complexity. A simple mechanical thermostat costs $8 and prevents overheating while minimizing power consumption.
For those building a weatherproof enclosure for remote observatory equipment on a budget, integrated heating should be part of the initial design, not an afterthought.
Power Management for Reliable Overnight Operation
Reliable power delivery requires more than a big power supply.
You need stable voltage, adequate current capacity, proper cabling, and ideally some redundancy. Each component in the power chain introduces potential failure points.
Start at the source. Is your power supply rated for continuous operation? Many consumer adapters are rated for intermittent use only. They overheat during extended runtime and shut down or reduce output.
Check voltage regulation. Cheap power supplies show significant voltage droop under load. A “5V” supply might deliver 4.6V when actually powering your camera. That’s below USB specification and causes erratic behavior.
Build a reliable power system:
- Use industrial or medical-grade power supplies (not consumer)
- Size supplies for 150% of measured maximum load
- Keep power cables as short as practical
- Use proper gauge wire (18 AWG minimum for 5V/2A over 10 feet)
- Add filtering capacitors near the camera
- Monitor voltage at the camera location
- Consider UPS backup for critical observation nights
The 5 essential power management solutions for unattended remote observatories guide covers advanced approaches for operators running multiple instruments.
Network Architecture for Cold Weather Reliability
Your network needs to be overbuilt for outdoor conditions.
Consumer networking gear is rated for climate-controlled environments. Specifications assume 60-80°F operation. Performance degrades rapidly outside this range.
Outdoor-rated network equipment costs more but eliminates an entire category of failures. Industrial ethernet switches, weatherproof WiFi access points, and UV-resistant cables all contribute to reliability.
Network hardening checklist:
- Use outdoor-rated ethernet cable (direct burial or aerial)
- Install switches in heated enclosures or use industrial models
- Implement redundant network paths when possible
- Monitor network performance with logging tools
- Set up alerts for packet loss or high latency
- Keep WiFi as backup only, never primary connection
Wired connections beat wireless every time for reliability. If you must use WiFi, choose equipment designed for outdoor deployment. Consumer WiFi adapters fail quickly in observatory environments.
The what network setup do you actually need for remote sky monitoring article covers topology options and equipment recommendations in detail.
Moisture Control Beyond Basic Desiccants
Desiccant packs stop working after absorbing a few grams of water. Your camera housing sees far more moisture than that each night.
Active moisture control maintains dry conditions indefinitely. Several approaches work, each with tradeoffs.
Sealed enclosures with dry gas purge eliminate moisture completely. Fill your camera housing with dry nitrogen or argon. Seal all penetrations. Water cannot enter. This works brilliantly but requires careful engineering and periodic recharging.
Constant airflow with heating provides excellent results with simpler implementation. A small fan pulls air through the enclosure. A heating element warms the air slightly. Warm air holds more moisture and prevents condensation.
The key is keeping air moving. Stagnant air allows moisture to settle. Gentle circulation distributes heat evenly and carries moisture away.
Practical moisture control:
- Install small 12V fan for continuous air circulation
- Add 5-10W heating element controlled by thermostat
- Vent enclosure to prevent pressure buildup
- Use foam weatherstripping to slow moisture entry (not seal completely)
- Point vent openings downward to prevent rain entry
Complete sealing sounds attractive but creates problems. Temperature changes cause pressure variations. Sealed enclosures can develop significant internal vacuum or pressure. This stresses seals and can damage equipment.
Camera Selection Matters More Than You Think
Not all cameras handle cold equally well.
Consumer webcams use the cheapest components that meet specifications. These components have narrow operating ranges. Industrial cameras use wider-tolerance parts that cost more but survive harsh conditions.
If you’re constantly fighting freezing issues, the problem might be your camera choice, not your installation.
Cold-weather camera features to prioritize:
- Extended temperature rating (at least 14°F to 122°F)
- Metal housing (better thermal stability than plastic)
- Separate power input (not USB-powered)
- Industrial USB chipset (not consumer)
- Conformal coating on circuit boards
- Wide input voltage range (handles supply variations)
Purpose-built astronomy cameras typically include these features. They cost 2-3x more than consumer webcams but eliminate most cold-weather problems.
The comparing wide-angle lenses for night sky webcam installations guide helps match camera and lens combinations for different observation goals.
Automation Reduces Manual Intervention
Manual troubleshooting at 2 AM gets old fast. Automation handles most problems without your involvement.
Modern observatory control software can monitor camera health, detect failures, and attempt recovery automatically. When recovery fails, it alerts you with specific diagnostic information.
Automation capabilities worth implementing:
- Automatic camera restart on freeze detection
- Power cycling via smart plugs or relay boards
- Network connection monitoring and recovery
- Temperature-triggered heating control
- Moisture sensor alerts
- Automated diagnostic logging
A Raspberry Pi or similar single-board computer can handle all of these tasks. Total cost runs under $100 including sensors and relay boards.
Scripts monitor your camera feed. When frames stop arriving, the script attempts software restart. If that fails, it cycles power to the camera. Still frozen? It sends you an alert with diagnostic data.
The how to automate your backyard observatory with open-source software resource provides implementation details and sample code.
Real-World Solutions from Working Observatories
Theory helps. Real experience matters more.
Observatory operators worldwide have solved these problems through trial and error. Their solutions work in actual conditions, not just on paper.
A suburban observatory in Minnesota runs five webcams year-round through temperatures down to -20°F. The operator’s solution? Each camera sits in a 3D-printed housing with a 7W PTC heater, a small fan, and foam insulation. Total cost per camera: $35 in added components. Failure rate dropped from 60% of winter nights to less than 5%.
A desert observatory in Arizona fights the opposite problem during summer but faces similar cold challenges in winter. Their approach uses thermoelectric coolers run in reverse as heaters. The same device cools cameras during 110°F days and heats them during 25°F nights. Elegant and efficient.
A coastal observatory battles humidity more than temperature. Their cameras run inside sealed acrylic domes with silica gel and small heating pads. They recharge the silica gel weekly during humid months. Simple but effective.
Testing Your Fixes Before the Next Observation Session
Don’t wait for the next cold night to validate your repairs.
Simulate conditions in a controlled environment. This lets you test solutions safely and iterate rapidly.
Indoor cold testing procedure:
- Place camera in a cooler or refrigerator
- Run cables through a small opening (seal around them)
- Add temperature logger inside with camera
- Gradually lower temperature while monitoring performance
- Note exact temperature where problems begin
- Test your fix at that temperature plus 10°F margin
- Run for 4-6 hours to verify stability
This approach reveals problems in minutes instead of waiting for the right weather conditions. You can test multiple solutions in a single afternoon.
For power testing, use a variable power supply. Gradually reduce voltage while monitoring camera operation. Find the minimum voltage for reliable operation. Ensure your installation delivers at least 0.3V above this threshold.
Network testing requires a separate approach. Use network simulation tools to introduce packet loss and latency. See how your camera and software respond. Adjust timeout values until operation remains stable with 5% packet loss.
When to Upgrade vs. When to Repair
Sometimes the right answer is better equipment, not more fixes.
If you’ve addressed power, temperature, moisture, and network issues but still experience regular failures, your camera likely can’t handle observatory conditions.
Consumer webcams have limits. You can extend their operating range somewhat, but you can’t fundamentally change their design constraints.
Upgrade indicators:
- Failures persist after addressing all environmental factors
- Camera works perfectly indoors but fails outdoors consistently
- Multiple cameras show identical failure patterns
- Manufacturer specs show narrow operating temperature range
- Camera uses plastic housing and consumer-grade components
Industrial or astronomy-specific cameras cost more upfront but save money long-term through reduced downtime and troubleshooting effort.
For operators just starting out, the how to build your first remote observatory webcam system for under 300 guide balances cost and reliability for entry-level installations.
Keeping Your Camera Running Through Winter
Solving webcam freezing issues comes down to understanding the specific failure mode affecting your setup.
Temperature, power, network, and moisture each create distinct symptoms. Systematic diagnosis identifies the real problem. Targeted fixes solve it permanently.
Most operators find that a combination of modest heating, stable power delivery, and proper moisture control eliminates 90% of cold-weather failures. The remaining 10% usually traces to equipment that simply isn’t rated for outdoor conditions.
Your observatory represents significant investment in time and equipment. Reliable camera operation protects that investment and ensures you capture the celestial events you’re actually trying to observe. The fixes outlined here have worked for hundreds of observatory operators in climates ranging from Minnesota winters to Arizona deserts.
Start with the diagnostic sequence. Identify your specific failure pattern. Implement the corresponding solution. Test thoroughly. Then get back to doing what you actually enjoy: observing the night sky.
Post Comment