Why Your Observatory Needs Automated Flat Field Calibration
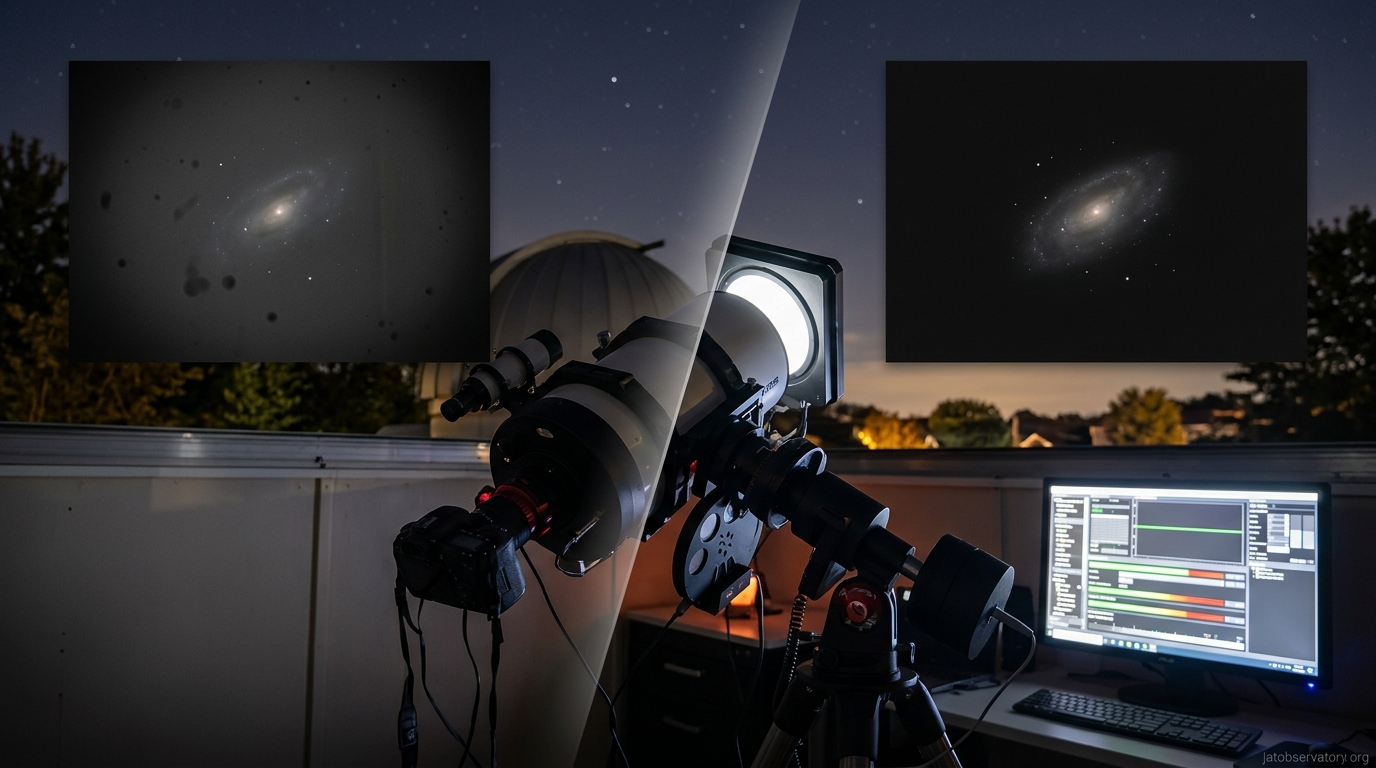
You’ve spent hours capturing deep sky data, only to find vignetting and dust donuts ruining your final stack. Manual flat field calibration solves this, but taking fresh flats every imaging session gets old fast. There’s a better way.
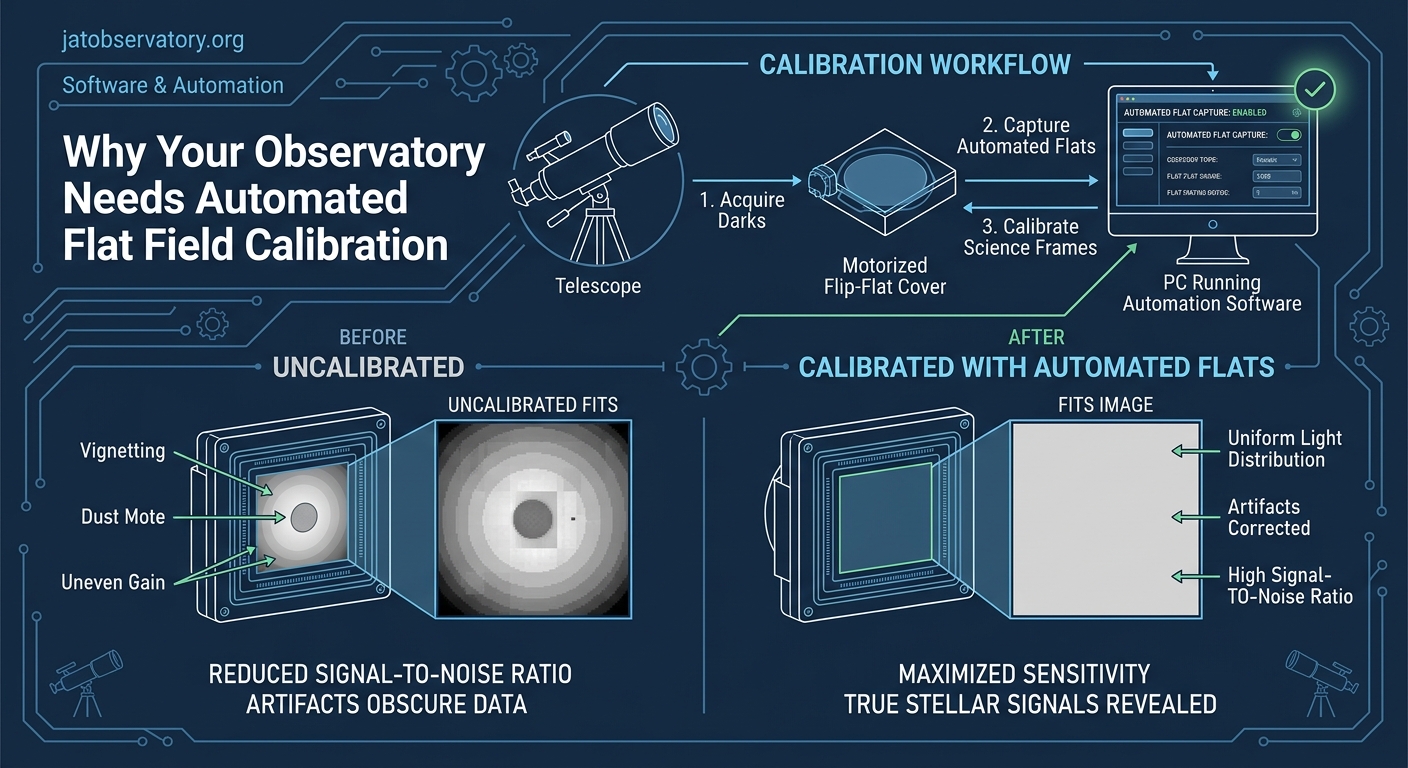
Automated flat field calibration removes optical artifacts from astrophotography images without manual intervention. By scheduling automated flat capture at twilight or using electroluminescent panels, observatories eliminate vignetting, dust shadows, and sensor variations consistently. This workflow saves time, improves data quality, and makes remote operation practical for serious imaging programs targeting galaxies and nebulae.
Why Flat Field Calibration Matters for Deep Sky Imaging
Flat field calibration corrects uneven illumination across your sensor. Every optical system creates vignetting. Dust particles on filters cast shadows. Sensor pixels respond differently to light.
Without proper flats, your images show these problems clearly. Dark corners. Donut-shaped artifacts. Uneven background gradients that resist processing.
Manual flat capture works, but demands perfect timing. You need evenly lit twilight sky or a light panel. The exposure must match your imaging session settings. Miss the window and you’re shooting without calibration frames.
Automated systems handle this scheduling for you. They capture flats at optimal times without human intervention. This consistency matters especially when photographing challenging targets like the Andromeda Galaxy where every bit of signal counts.
Understanding Flat Frame Requirements
Flat frames need specific conditions to work properly. The light source must be uniform across the field of view. Exposure should land in the middle third of your camera’s dynamic range.
Temperature matters less for flats than darks, but filter position must match exactly. If you image through an LRGB filter wheel, you need separate flats for each filter.
Timing creates the biggest challenge for manual workflows. Twilight flats require catching that brief window when the sky is evenly lit but not too bright. Dawn works better than dusk for most setups since you’ve just finished imaging and know your exact configuration.
Sky flats provide the most accurate correction because they use the same light path as your targets. Panel flats offer convenience but can miss some optical characteristics.
“The difference between good flats and great flats often comes down to consistency. Automated systems nail the same exposure, timing, and positioning every single session. That repeatability shows up in your final stacks.” – Observatory automation specialist
Building an Automated Flat Capture System
Creating automated flat field calibration requires three components: timing control, light source management, and camera integration.
Your automation software needs to trigger flat capture at specific times or conditions. Most observatory control platforms support scheduled tasks. You can set flats to run 30 minutes after sunset or when sky brightness hits a target value.
Light sources fall into two categories:
- Electroluminescent panels mounted over the telescope aperture
- Motorized covers with built-in illumination
- White fabric screens with controlled LED backlighting
- Twilight sky with automated pointing to blank areas
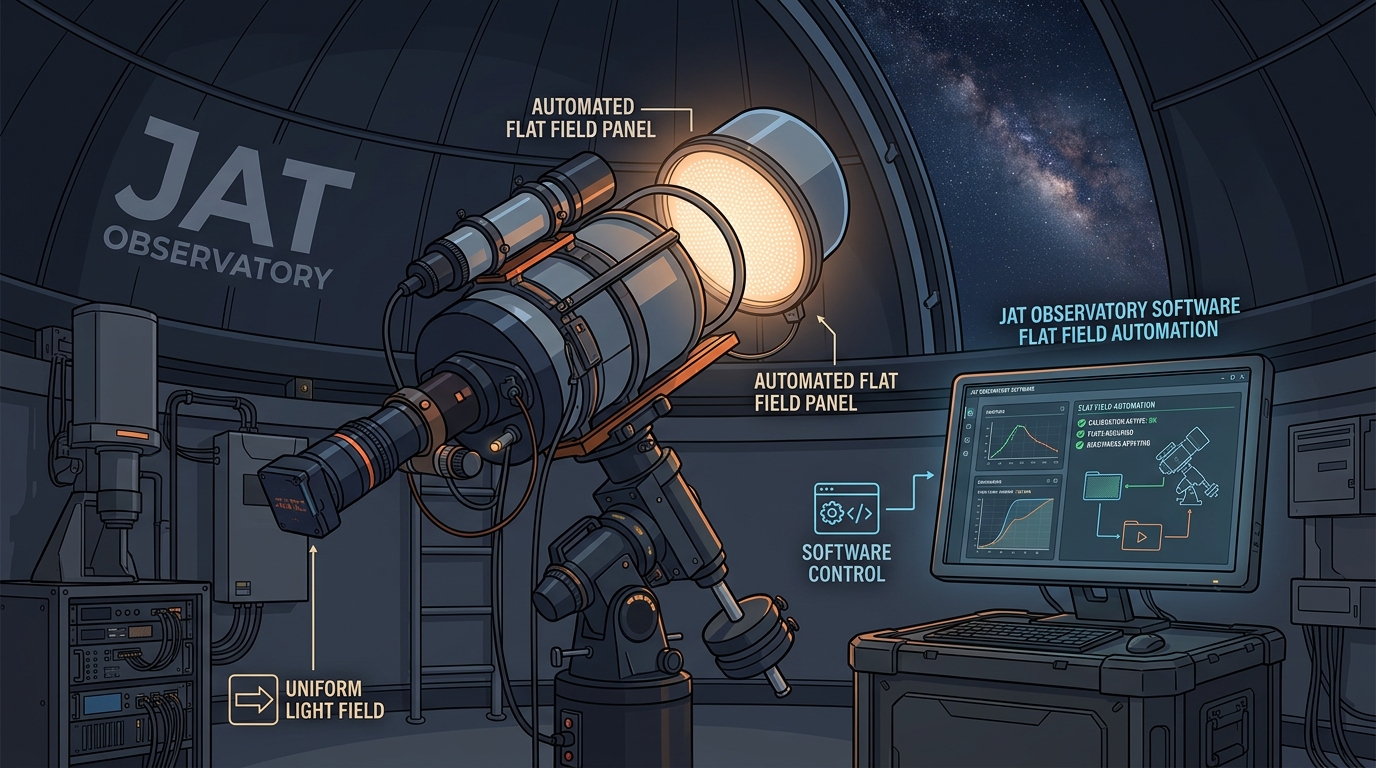
Panel systems offer the most flexibility. They work regardless of weather or time constraints. A quality EL panel provides even illumination without hotspots.
The control system coordinates everything. It parks the telescope, closes the observatory if using sky flats, activates the light source, captures frames at proper exposures, then resumes normal operations.
Step-by-Step Automated Flat Workflow
Here’s how to implement automated flat field calibration from scratch:
- Install your flat light source with reliable power control that your automation software can trigger.
- Create flat capture scripts that set proper exposure times for each filter based on test frames.
- Schedule flat acquisition for optimal timing, typically dawn twilight or immediately after imaging sessions end.
- Configure your camera software to save flats in organized directories with proper metadata and file naming.
- Set up validation checks that verify flat frame quality before accepting them into your calibration library.
- Build a library management system that archives flats by date, filter, and optical configuration for later use.
This workflow runs without supervision once configured. Your observatory captures fresh calibration data automatically.
Common Flat Field Calibration Mistakes
| Mistake | Why It Fails | Better Approach |
|---|---|---|
| Using old flats with new dust | Dust patterns change constantly | Capture fresh flats weekly minimum |
| Wrong exposure levels | Over or underexposed flats add noise | Target 40-60% of sensor range |
| Mismatched temperature | Thermal gradients affect correction | Use flats from same session |
| Single flat frame | Noise dominates the correction | Stack 15-25 flat frames minimum |
| Ignoring filter position | Each filter has unique characteristics | Separate flat sets per filter |
Temperature matching matters less than most people think. Focus position matters more. If your focuser shifts between filters, your flats must match those positions exactly.
Many astrophotographers skip flat validation. They assume the automated system worked. Always check a sample. Look for even histograms and absence of artifacts.
Software Solutions for Flat Automation
Several platforms handle automated flat field calibration well. Your choice depends on existing equipment and budget.
NINA (Nighttime Imaging ‘N’ Astronomy) offers free, powerful automation. It supports scheduled flat capture with multiple light source types. The sequencer lets you build complex workflows that handle flats alongside imaging targets.
Sequence Generator Pro provides commercial-grade automation with extensive flat options. It manages panel brightness, exposure calculation, and quality verification automatically.
For those building custom solutions, observatory automation using open-source software provides flexibility. Python scripts can control cameras, light panels, and scheduling through ASCOM or INDI interfaces.
The software should calculate proper exposures automatically. It measures light source brightness and adjusts exposure time to hit target ADU levels. This eliminates manual exposure testing.
Integration with your main imaging workflow matters. Flats should capture after each session using identical camera settings, temperature, and filter positions.
Hardware Considerations for Flat Panels
Electroluminescent panels work best for most automated setups. They provide even illumination without hotspots or color casts.
Size the panel to cover your telescope aperture completely. Add 20% margin to ensure edge coverage. A 12-inch panel works for most 8-inch systems.
Mount the panel on a motorized flipper or sliding mechanism. It needs to move into position for flats, then retract for imaging. Motorized telescope covers can integrate flat panels directly.
Power control requires a switched outlet your automation software can trigger. Smart plugs work but add network dependencies. Relay boards offer more reliable control.
Panel brightness should be adjustable. Different filters need different light levels. Dimmer control lets your software optimize exposure times automatically.
White LED strips provide an alternative to EL panels. They cost less but require careful diffusion to eliminate hotspots. Multiple layers of white acrylic or professional diffusion material work well.
Twilight Flat Automation Strategies
Sky flats remain the gold standard for optical accuracy. Automation makes them practical for regular use.
The challenge is timing. You need the sky bright enough for short exposures but not so bright that gradients appear. This window lasts 15-30 minutes.
Automated twilight flat systems use light meters or test exposures to detect optimal conditions. When brightness hits the target range, the system captures flats for all filters before the window closes.
Point the telescope at a blank area of sky. Zenith works well in most cases. Avoid areas near the horizon where gradients appear.
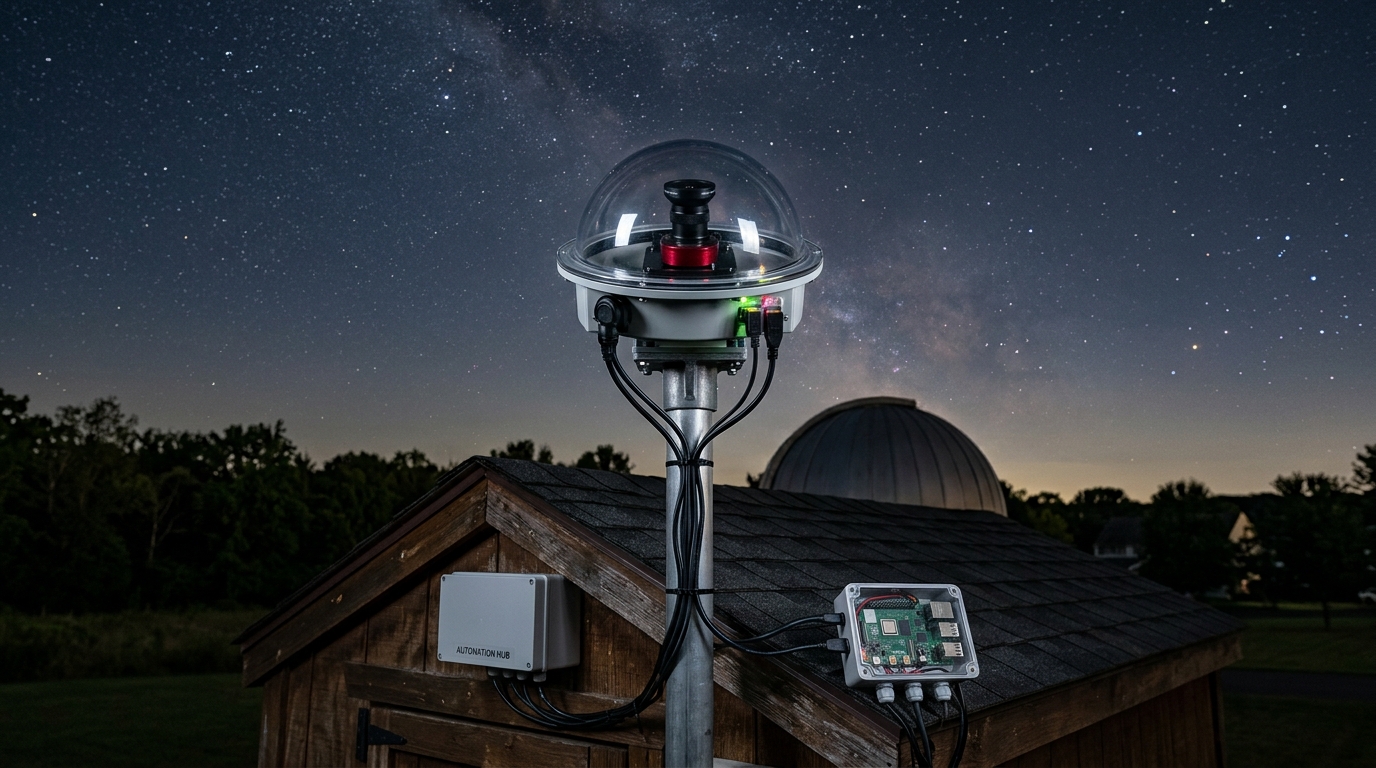
Some observatories use all-sky camera systems to monitor sky brightness in real time. When conditions hit the sweet spot, flat capture begins automatically.
Weather presents the main limitation. Cloudy mornings prevent sky flats. Panel backup systems ensure you always have calibration options.
Integration with Remote Observatory Operations
Remote observatories benefit most from automated flat field calibration. You can’t manually capture flats when operating from hundreds of miles away.
The automation must handle failures gracefully. If flat capture fails, the system should log the error and continue with existing calibration frames rather than stopping completely.
Power management solutions need to account for flat panel draw. Calculate total power budget including panel operation during twilight.
Network monitoring lets you verify flat capture succeeded. Set up alerts that notify you if flat frames fail quality checks or don’t appear in expected directories.
Remote desktop access helps troubleshoot issues. Observatory control solutions should provide easy access to flat capture logs and preview images.
Store flats locally and sync to cloud backup. This redundancy protects your calibration library if local storage fails.
Maintaining Your Automated Flat System
Regular maintenance keeps automated calibration running smoothly. Check these items monthly:
- Clean optical surfaces and verify dust hasn’t accumulated on filters or sensor windows
- Test flat panel illumination for dead pixels or dimming that affects uniformity
- Verify motorized mechanisms move smoothly without binding or positional errors
- Review flat frame quality metrics to catch degradation before it impacts imaging
- Update automation scripts when changing equipment or optical configurations
Panel lifespan varies by technology. EL panels typically last 3-5 years before brightness degrades noticeably. LED systems last longer but may develop individual LED failures.
Keep a backup light source ready. When your primary panel fails, you want immediate replacement capability. This prevents losing imaging sessions to calibration problems.
Document your flat capture settings. When you change cameras or optical trains, you’ll need to reconfigure exposure times and validation thresholds. Good notes save hours of testing.
Advanced Flat Calibration Techniques
Standard flat field calibration handles most situations well. Advanced techniques address specific challenges.
Synthetic flat generation uses multiple flat frames from different sessions to build super-flats that reduce noise further. This works well for long-term projects where you accumulate many calibration frames.
Dithered flats help with stubborn dust donuts. By slightly shifting the camera between flat exposures, you can average out some artifacts that resist normal correction.
Gradient correction sometimes needs additional processing beyond flats. Background extraction tools in PixInsight or similar software handle large-scale variations that flats miss.
Some imagers separate vignetting correction from dust correction. They use sky flats for vignetting and panel flats for dust shadows. This hybrid approach works well for fast optical systems where vignetting dominates.
Filter-specific flat libraries grow over time. Archive flats by filter, date, and optical configuration. When dust patterns stabilize, you can reuse recent flats rather than capturing new ones every session.
Cost Analysis of Flat Automation
Budget for automated flat field calibration varies widely based on approach.
Basic twilight automation costs nothing beyond software. You’re using existing equipment and free sky illumination. This works fine if you image regularly and can catch dawn consistently.
Entry-level EL panel systems start around $150 for the panel plus $50 for motorized mounting and control hardware. Total investment under $250 gets you reliable automated flats.
Professional motorized covers with integrated flat panels run $800-2000 depending on aperture size. These provide the most elegant solution but cost significantly more.
Building your own automated system can reduce costs. DIY flat panels using LED strips and diffusion material cost $50-75 in materials.
Compare this to time saved. Manual flat capture takes 15-30 minutes per session. At 100 sessions per year, automation saves 25-50 hours. That time goes toward imaging or processing instead.
Troubleshooting Automated Flat Capture
When automated flats fail, systematic troubleshooting identifies the problem fast.
Check exposure first. Underexposed flats show as dark frames with low ADU counts. Overexposed flats clip and lose detail. Both fail to correct properly.
Verify light source operation. Dead panels or failed LEDs create uneven illumination. Visual inspection catches obvious problems. Analyze flat frames for brightness patterns.
Timing issues cause many failures. Scripts that trigger too early catch gradient-filled twilight. Too late and the sky is too dark. Log timestamps and compare to actual sky conditions.
Camera settings must match between flats and light frames. Different binning, gain, or offset values make flats useless. Automation should copy settings from the imaging sequence.
File management problems prevent flats from reaching calibration software. Check file paths, permissions, and naming conventions. Missing metadata causes sorting failures.
Making Flat Field Calibration Work for Your Observatory
Start simple and expand as you gain experience. Basic twilight automation works well for many setups. Add panel systems when remote operation or weather flexibility becomes necessary.
Test thoroughly before relying on automated flats for important data. Capture both automated and manual flats for several sessions. Compare results to verify your system works correctly.
Document everything. Future you will thank past you for noting exposure times, panel settings, and timing parameters that work well.
Join online communities where observatory operators share automation experiences. Astronomy forums provide troubleshooting help and optimization tips.
Automated flat field calibration transforms astrophotography from a manual chore into a reliable background process. Your images improve. Your time gets spent on interesting work instead of repetitive calibration tasks. The initial setup effort pays dividends across every imaging session that follows.

Post Comment