Building a Fully Automated All-Sky Camera System for Under $300
Most commercial all sky cameras cost between $800 and $2,500. That price tag keeps many amateur astronomers from setting up automated sky monitoring. But you can build a fully functional system for under $300 using readily available components, open source software, and a weekend of assembly time.
Building a DIY all sky camera under $300 requires a Raspberry Pi 4, wide angle camera module, weatherproof dome, power supply, and AllSky software. This budget system captures meteor showers, aurora activity, and noctilucent clouds automatically while generating time lapse videos. The setup takes one weekend to assemble and configure, delivering performance comparable to systems costing three times more.
Essential Components for Your Budget Build
The core of any all sky camera system consists of five main components. Each serves a specific purpose, and cutting corners on the wrong parts will compromise your results.
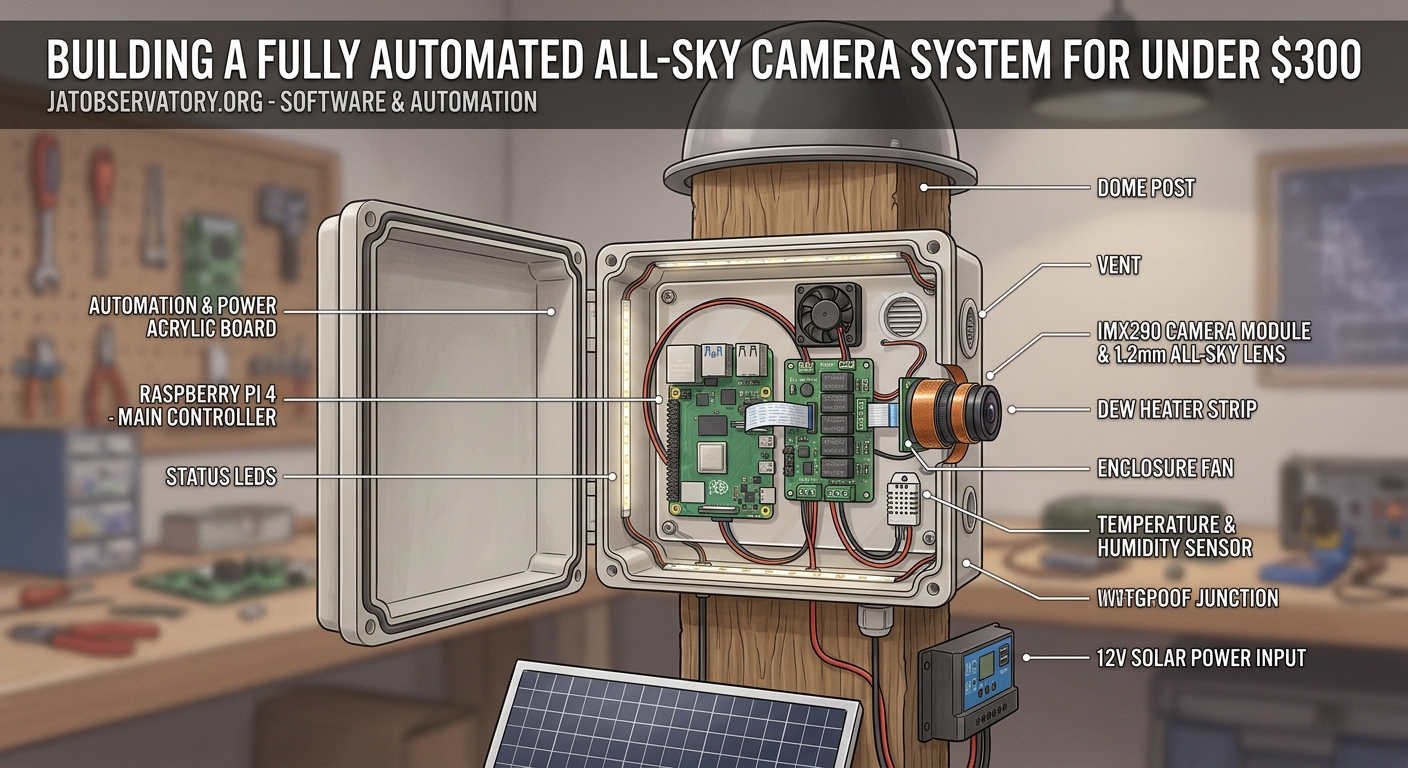
Start with a Raspberry Pi 4 with at least 4GB of RAM. The extra memory handles image processing and video encoding without lag. A Raspberry Pi 3B+ works but struggles with higher resolution captures and simultaneous tasks.
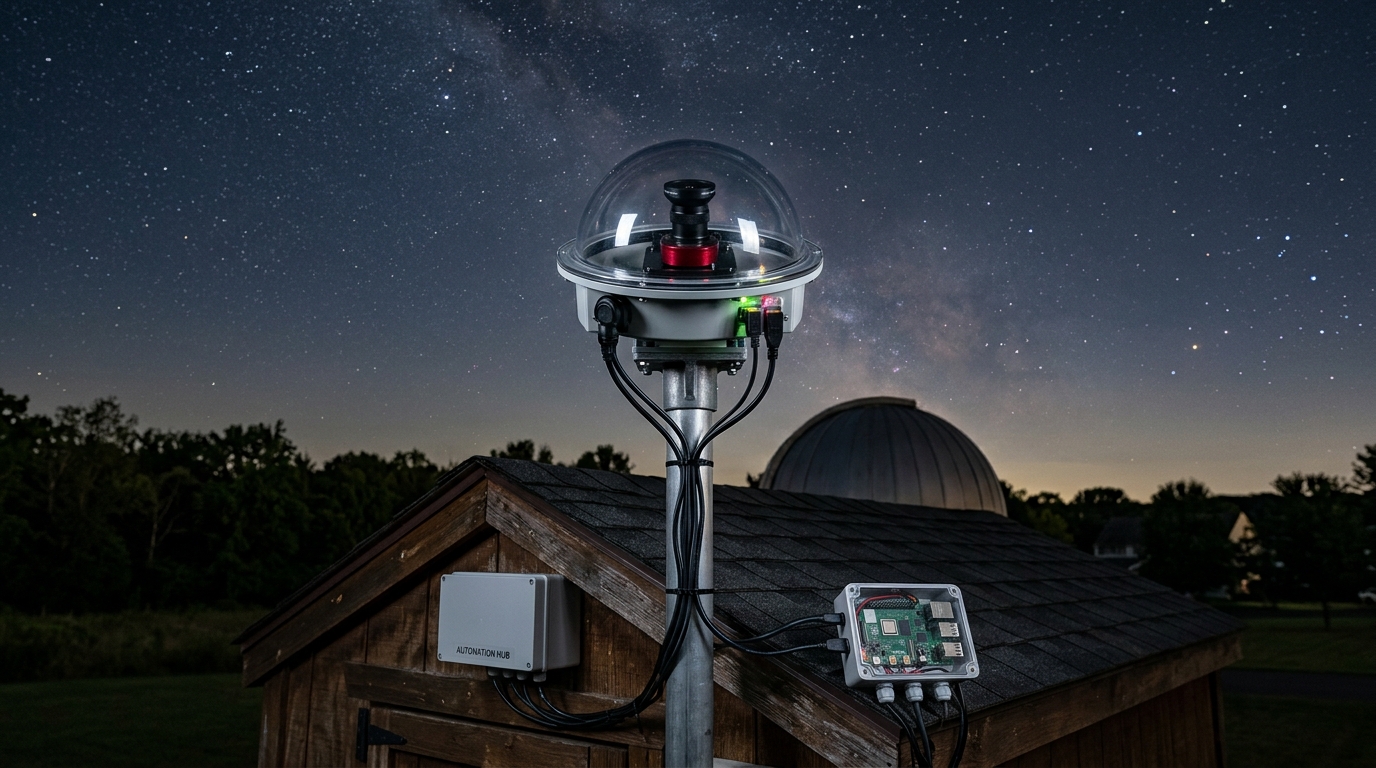
Your camera module determines image quality. The Raspberry Pi HQ Camera with a 1.6mm fisheye lens provides 180 degree coverage and excellent low light performance. This combination costs around $100 but captures stars down to magnitude 4 or 5 under suburban skies.
For the protective dome, a 6 inch acrylic dome from security camera suppliers works perfectly. These cost $30 to $50 and withstand rain, snow, and UV exposure. Avoid glass domes, which create internal reflections and cost significantly more.
Power management matters for 24/7 operation. A weatherproof 12V 3A power supply with a buck converter to 5V keeps the system running reliably. Budget $25 for quality power components that won’t fail during winter storms.
Storage needs depend on your retention goals. A 128GB microSD card stores about two weeks of full resolution images before the system overwrites old files. For longer archives, add a USB hard drive or network attached storage.
Step by Step Assembly Process
Building your all sky camera follows a logical sequence. Rushing through steps or skipping weatherproofing tests leads to failures during the first rainstorm.
- Flash the AllSky software image to your microSD card using Raspberry Pi Imager or Etcher.
- Connect the camera module to the Raspberry Pi CSI port, ensuring the ribbon cable is properly seated.
- Mount the Raspberry Pi inside a weatherproof junction box with cable glands for power and network connections.
- Attach the camera to an adjustable mount that allows precise leveling and orientation.
- Seal all openings with silicone sealant rated for outdoor use and temperature extremes.
- Install the acrylic dome over the camera lens, leaving a small air gap to prevent condensation.
- Power up the system and connect via SSH to complete the software configuration.
The entire assembly takes about four hours if you work methodically. Having all tools and materials ready before starting saves frustration and prevents mid project trips to the hardware store.
Software Configuration That Actually Works
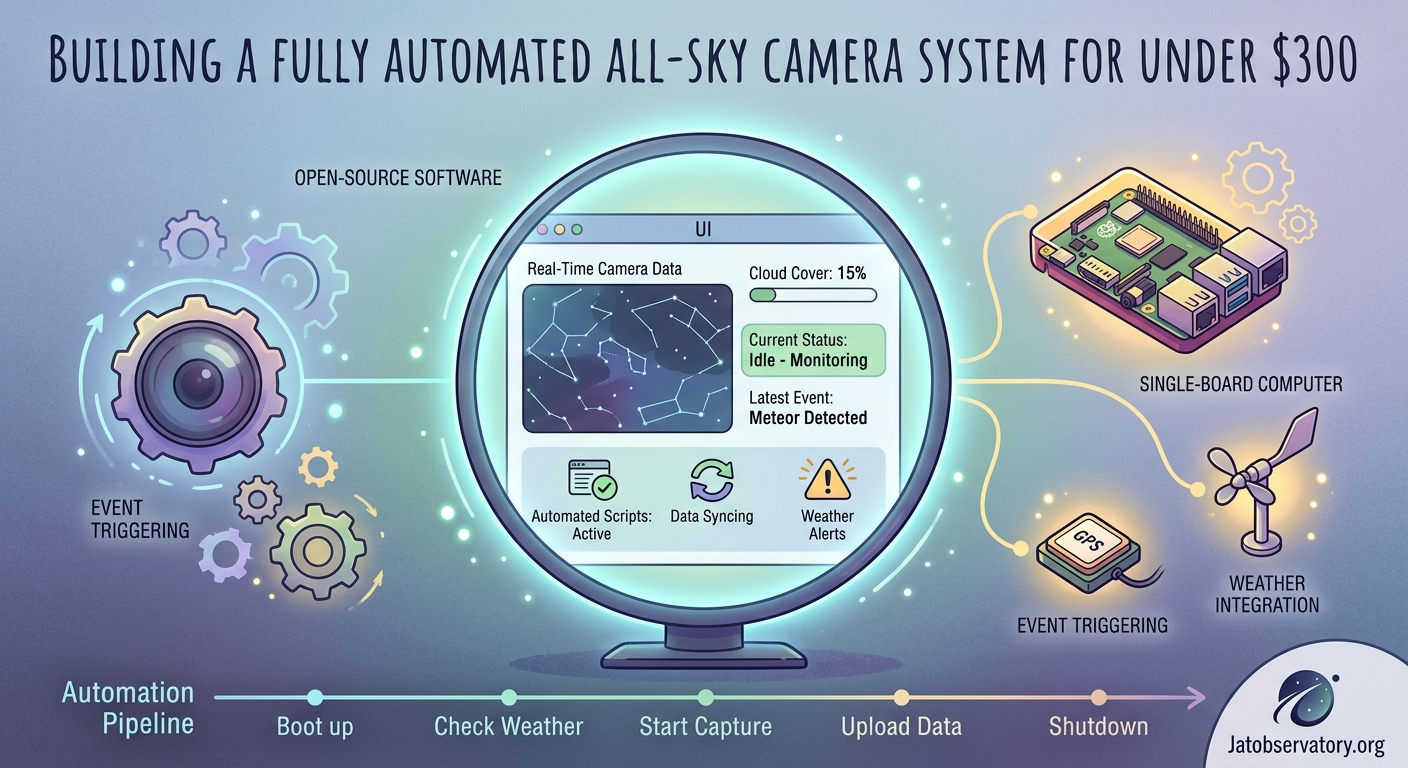
AllSky software handles image capture, processing, and upload automatically. But the default settings rarely match your specific location and equipment.
Access the web interface by navigating to your Raspberry Pi’s IP address in any browser. The settings page contains dozens of options, but five categories need immediate attention.
Camera settings control exposure, gain, and image format. Start with 10 second exposures at ISO 400 equivalent gain. Adjust based on your sky brightness and desired star sensitivity. The building an all sky camera system to monitor celestial patterns year round guide covers advanced exposure techniques for different conditions.
Image processing options include dark frame subtraction, hot pixel removal, and brightness adjustments. Enable dark frame subtraction to reduce sensor noise in long exposures. The system captures calibration frames automatically during daylight hours.
Upload settings determine where your images go. Configure FTP, SFTP, or web upload to your preferred hosting. Many users run a simple web server on the same Raspberry Pi to view images locally without internet dependency.
Time lapse generation creates daily movies from your image sequences. Set the frame rate to 25 fps for smooth motion that compresses a full night into two minutes. Higher frame rates look choppy and increase file sizes unnecessarily.
Overlay options add timestamps, location data, and sky quality measurements to each frame. These annotations help when reviewing footage for specific events or sharing captures with other observers.
Weatherproofing Techniques That Prevent Failures
Water damage kills more DIY astronomy projects than any other factor. Proper weatherproofing requires attention to detail and quality materials.
The junction box housing your Raspberry Pi needs three types of protection. Cable glands seal wire entry points against rain and insects. Desiccant packs inside the enclosure absorb moisture from temperature cycling. Ventilation holes with breathable membranes equalize pressure without allowing water ingress.
Your camera dome accumulates dew on cold nights, obscuring the view. A dew heater strip wrapped around the dome edge prevents condensation. Power it from a separate 12V output on your power supply, controlled by a temperature sensor that activates heating only when needed.
Professional observatory operators recommend testing weatherproofing with a garden hose before permanent installation. Spray your assembled system from all angles for five minutes. Any water inside means you need better sealing.
UV exposure degrades acrylic domes over time, causing yellowing and reduced transparency. Apply a thin coat of automotive plastic protectant every six months. This treatment extends dome life from two years to five or more.
Mounting Solutions for Stable Operation
Your camera mount affects image quality as much as the lens itself. Vibration from wind or nearby traffic creates star trails and ruins time lapse sequences.
A simple pipe flange bolted to a solid surface provides excellent stability. Use 3/4 inch galvanized pipe fittings to build a custom height and angle. This approach costs under $20 and handles moderate wind without movement.
For roof installations, lag bolts into rafters or trusses prevent bouncing from foot traffic below. Never mount to roof sheathing alone. The thin plywood flexes with temperature changes and creates constant realignment headaches.
Ground mounted posts need concrete footings below frost depth. A 4×4 post in 12 inches of concrete stays stable through freeze thaw cycles. Add guy wires if your location experiences sustained winds above 30 mph.
Leveling matters more than most builders realize. A camera tilted even 2 degrees produces distorted sky coverage and complicates meteor trajectory calculations. Use a quality bubble level during installation and recheck monthly for the first season.
Common Mistakes and How to Avoid Them
First time builders make predictable errors that compromise system performance. Learning from others saves time and money.
| Mistake | Consequence | Solution |
|---|---|---|
| Undersized power supply | Random reboots, corrupted images | Use 3A minimum, quality branded adapter |
| No dew prevention | Foggy images after sunset | Install heating strip with thermostat control |
| Poor lens cleaning | Gradual image degradation | Clean monthly with microfiber, never paper |
| Inadequate ventilation | Condensation inside housing | Add breathable vent membranes on opposite sides |
| Skipping calibration | Inaccurate sky measurements | Run dark frames weekly, update as needed |
The most expensive mistake is choosing the wrong camera module. Some builders try using standard webcams or action cameras. These lack the sensitivity needed for faint stars and produce disappointing results. Invest in a proper astronomy camera from the start.
Automation Scripts That Save Time
Manual operation defeats the purpose of an all sky camera. Automation handles routine tasks and responds to changing conditions without your intervention.
The AllSky software includes basic scheduling, but custom scripts add powerful capabilities. A simple bash script checks weather APIs and pauses capture during rain. This prevents wasted storage on blank cloudy images.
Meteor detection scripts analyze each frame for sudden brightness changes. When detected, the system saves the full resolution image and sends an alert. The 5 unexpected meteor shower captures our all sky camera recorded this year article shows what automated detection catches.
Image upload scripts can be conditional based on file size or content analysis. This reduces bandwidth usage when hosting on metered connections. Only upload images that contain visible stars or interesting cloud formations.
Backup automation copies your best captures to cloud storage or external drives. Schedule these transfers during off peak hours to avoid impacting real time operations. A weekly backup routine prevents losing months of data to SD card failure.
The how to automate your backyard observatory with open source software resource covers advanced scripting techniques for multiple observatory systems.
Network Connectivity Options
Your all sky camera needs reliable network access for remote monitoring and image uploads. Three connection methods work for different situations.
Wired ethernet provides the most stable connection. Run outdoor rated Cat6 cable from your router to the camera location. Bury the cable 6 inches deep or run it through conduit to prevent damage from lawn equipment.
WiFi works when running cable isn’t practical. Use a high gain antenna or WiFi extender to ensure strong signal strength. Weak connections cause upload failures and make remote troubleshooting difficult. The what network setup do you actually need for remote sky monitoring guide covers range extension techniques.
Cellular connections serve remote sites without internet access. A USB LTE modem provides adequate bandwidth for image uploads. Choose a data plan with at least 10GB monthly allowance for continuous operation.
Static IP addresses or dynamic DNS services let you access your camera from anywhere. Configure port forwarding on your router to reach the web interface remotely. Always use strong passwords and consider VPN access for added security.
Performance Optimization Tips
Getting the most from your budget hardware requires tuning several parameters. Small adjustments produce noticeable improvements in image quality and system reliability.
Reduce the capture resolution during twilight hours when stars aren’t visible. Lower resolution images process faster and consume less storage. Switch to full resolution only when sky brightness drops below a threshold value.
Adjust gain settings based on moon phase. High gain during new moon captures fainter stars. Lower gain during full moon prevents overexposure and preserves detail in bright areas.
Enable GPU acceleration for image processing tasks. The Raspberry Pi 4 GPU handles many operations faster than the CPU. This reduces processing time and system load.
Schedule maintenance tasks during daylight hours. Running system updates or backups while capturing images causes dropped frames and timing issues. A cron job that checks the sun elevation prevents conflicts.
Monitor system temperature, especially during summer months. Add heat sinks to the Raspberry Pi CPU and consider a small fan if temperatures exceed 70°C. Thermal throttling reduces performance and shortens hardware lifespan.
Capturing Specific Celestial Events
Different astronomical phenomena require different camera settings. Understanding these variations helps you prepare for special events.
Meteor showers need shorter exposures to freeze meteor trails. Switch from 10 second exposures to 5 seconds during peak activity. This captures sharp trails without excessive star trailing.
Aurora displays benefit from increased sensitivity. Raise the gain setting and extend exposure time to 15 seconds. The extra sensitivity reveals faint aurora structure invisible to the naked eye. Check out examples of when light pollution actually helped documenting noctilucent clouds from our observatory for unusual capture scenarios.
Noctilucent clouds appear during twilight in summer months. Configure your system to continue capturing after sunset and before sunrise during June and July. These rare clouds form at extreme altitudes and glow against the dark sky.
Satellite passes and the International Space Station create bright streaks across your images. No special settings needed, but reviewing images shortly after predicted passes helps identify successful captures.
Lunar eclipses require exposure bracketing to capture both the bright moon and surrounding stars. Set up a script that varies exposure time throughout the eclipse progression.
Maintenance Schedule for Long Term Reliability
Regular maintenance prevents small issues from becoming system failures. A monthly routine takes 30 minutes and keeps your camera operating reliably.
- Clean the dome exterior with microfiber cloth and distilled water
- Inspect all cable connections for corrosion or loosening
- Verify desiccant packs are still active, replace if saturated
- Check SD card health using built in diagnostics
- Review system logs for errors or warnings
- Test backup and upload functions
- Update AllSky software if new versions are available
Seasonal maintenance addresses weather related wear. Before winter, verify heating elements work properly and check that insulation remains intact. Before summer, clean ventilation paths and confirm cooling is adequate.
Annual maintenance includes replacing the acrylic dome if it shows significant yellowing or scratching. Even with UV protection, domes degrade after 3 to 5 years of continuous outdoor exposure.
Expanding Your System Capabilities
Once your basic all sky camera runs reliably, several upgrades add functionality without major expense.
A second camera with a narrower field of view captures higher resolution images of specific sky regions. Mount it alongside your all sky camera and coordinate captures for simultaneous wide and detail views.
Weather sensors integrated with your camera system provide context for your images. Temperature, humidity, and barometric pressure data help explain atmospheric phenomena visible in your captures.
Cloud detection sensors automatically adjust exposure settings based on sky conditions. These sensors cost $50 to $100 and significantly improve image quality across varying weather.
Remote power control lets you reboot stuck equipment without physical access. A WiFi controlled outlet costs $15 and saves trips to the camera location for simple resets.
Sky quality meters measure light pollution levels and track changes over time. This data complements your images and contributes to citizen science light pollution monitoring projects.
Comparing Your Results to Commercial Systems
Budget builds deliver surprisingly competitive performance compared to commercial all sky cameras. Understanding the tradeoffs helps set realistic expectations.
Image quality from a Raspberry Pi HQ camera with quality lens matches or exceeds many $1,000 commercial units. The larger sensor and superior optics compensate for less sophisticated processing.
Reliability favors commercial systems with redundant components and industrial grade enclosures. Your DIY system needs more frequent maintenance but costs one third as much to replace if damaged.
Software features vary significantly. Commercial systems offer polished interfaces and phone apps. DIY systems provide more customization but require comfort with configuration files and command line tools.
Support differs dramatically. Commercial vendors provide phone and email support. DIY builders rely on online forums and community documentation. The the best online astronomy forums and communities for backyard observers in 2026 helps you find knowledgeable communities.
Troubleshooting Common Issues
Even well built systems encounter occasional problems. Knowing how to diagnose issues reduces downtime and frustration.
Images too dark usually indicates incorrect gain settings or exposure time. Check that your camera isn’t in daylight mode during night captures. Verify the lens cap is actually removed, an embarrassingly common oversight.
Blurry images suggest focus problems or vibration. Refocus the lens using live view on bright stars. Check mounting stability and tighten any loose connections.
Missing images in sequences point to timing issues or storage problems. Verify your SD card isn’t full and has adequate write speed. Check system logs for capture errors or timeouts.
Network connectivity failures often result from IP address changes or router reboots. Configure a static IP address or reliable dynamic DNS service to maintain consistent access.
Condensation inside the housing means your weatherproofing has failed. Immediately power down the system, dry all components thoroughly, and reseal problem areas before resuming operation.
Cost Breakdown and Budget Alternatives
Understanding where your money goes helps optimize spending and identify potential savings.
The camera and lens represent your largest single expense at $100. This is not the place to economize. Cheaper cameras produce poor results that defeat the entire project purpose.
The Raspberry Pi 4 costs $55 for the 4GB model. You can save $20 using a 2GB version, but performance suffers with multiple concurrent processes.
Weatherproof enclosures and domes total $60 to $80 depending on quality and features. Generic security camera domes work fine and cost half what astronomy specific domes charge.
Power supplies and cabling add $30 to $40. Quality matters here. Cheap power adapters fail in cold weather and create voltage fluctuations that corrupt images.
Miscellaneous hardware including mounting brackets, sealants, and fasteners costs $20 to $30. Shop hardware stores rather than specialty astronomy suppliers for significant savings.
Total system cost ranges from $265 to $305 depending on component choices and whether you already own some parts. Adding optional upgrades like heating elements or weather sensors increases the budget by $50 to $100.
Real World Performance Expectations
Setting realistic expectations prevents disappointment and helps you judge when your system performs correctly.
Star detection depends heavily on local light pollution. Under dark rural skies, your camera captures stars to magnitude 5 or 6. Suburban locations typically reach magnitude 4. Urban sites struggle to show anything fainter than magnitude 3.
Meteor detection rates vary with shower intensity and your processing sensitivity. During major showers like the Perseids, expect to capture 20 to 40 meteors per night. Sporadic meteors outside shower peaks yield 2 to 5 captures nightly.
Aurora visibility requires both geomagnetic activity and favorable latitude. Cameras at 45 degrees north latitude occasionally capture strong displays. Higher latitudes see aurora regularly, while locations below 40 degrees rarely record visible activity.
Time lapse quality improves with experience tuning exposure and processing settings. Early attempts look amateurish. After a month of adjustments, your videos rival professional productions.
System uptime for a well built camera exceeds 95% over a year. Expect occasional downtime for maintenance, weather damage repairs, or software updates. Commercial systems typically achieve 98% uptime but cost three times more.
Taking Your First Sky Images Tonight
You’ve assembled the hardware, configured the software, and mounted everything securely. Now comes the rewarding part: capturing your first all sky images.
Start your first night with conservative settings. Use 10 second exposures at moderate gain. Let the system run for several hours while you monitor performance remotely. Check images periodically to verify proper exposure and focus.
Don’t expect perfect results immediately. Your first captures will reveal issues you didn’t anticipate. Stars might appear elongated, indicating focus problems. The image might be too bright or too dark. Adjust settings incrementally and document what works.
Compare your images to other all sky cameras in your region. Many operators share live feeds online. This comparison helps you judge whether your results are typical or need improvement.
Join online communities where all sky camera operators share experiences and troubleshooting advice. Post your setup details and sample images. Experienced builders offer specific suggestions based on what they see.
Most importantly, be patient with the learning process. Every professional observatory started with trial and error. Your budget system will improve steadily as you refine settings and develop maintenance routines. Within a few weeks, you’ll capture celestial events that justify every hour spent building and tuning your DIY all sky camera under $300.

Post Comment