Can You Photograph Zodiac Constellations From a Light-Polluted Suburban Observatory?
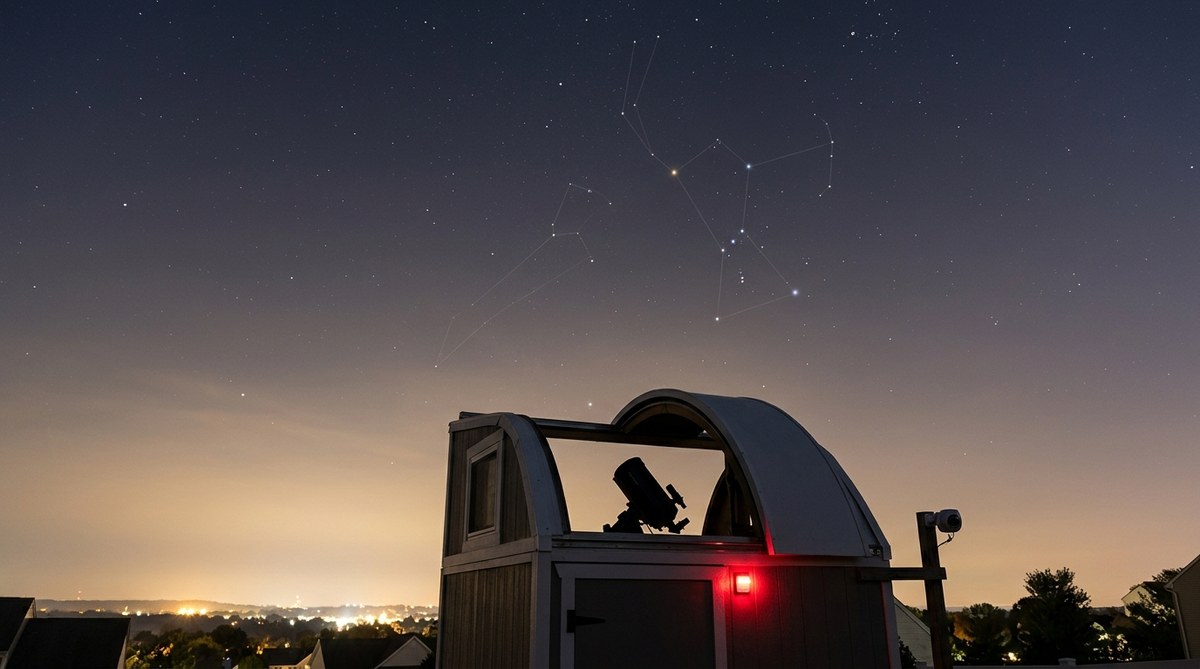
Getting clear shots of zodiac constellations from a suburban backyard or areas affected by light pollution can seem challenging. Bright city lights often wash out the faint stars that make up these iconic patterns. But with the right approach, you can still create stunning astrophotos of the zodiac even in less-than-ideal conditions. Whether you are an amateur astronomer or an astrophotographer eager to snap these celestial figures from your own light-polluted neighborhood, this guide will walk you through practical steps to improve your results.
Capturing zodiac constellations from light-polluted areas requires strategic planning, proper equipment, and specific techniques. Even under bright skies, you can reveal these star patterns by choosing the right time, using filters, and employing post-processing skills to bring out faint details. Persistence and patience are key to creating vivid images that showcase the beauty of these ancient star formations from your suburban setup.
Understanding the Challenges of Light Pollution and Zodiac Photography
Light pollution is the main obstacle for astrophotographers trying to document zodiac constellations. The glow of streetlights, cars, and urban development diminishes the visibility of faint stars and the subtle patterns they form. When photographing zodiac constellations in such conditions, you are often limited to capturing only the brightest stars, which can make the patterns appear incomplete or washed out.
However, light pollution does not make zodiac photography impossible. It just demands a more calculated approach. Recognizing how light pollution affects your sky and knowing what can be achieved within these constraints is the first step. For example, the Bortle scale helps you assess sky darkness, and understanding where your location falls on this scale helps you plan your sessions better.
Practical Steps to Photograph Zodiac Constellations from Light-Polluted Areas
Follow these steps to enhance your chances of capturing zodiac constellations despite light interference:
1. Choose the Right Time and Conditions
Timing is crucial. Aim for nights when the moon is absent or in a new moon phase. Moonlight adds to sky brightness, further reducing contrast. Also, select nights with stable atmospheric conditions and minimal cloud cover. Late night and early morning hours often offer darker skies as local lights turn off.
2. Use Appropriate Equipment and Settings
Opt for a camera with good low-light performance. DSLRs or mirrorless cameras with larger sensors typically handle light pollution better. Employ a fast lens or telescope with a wide aperture to gather more light. When setting up your camera:
- Use a high ISO setting but avoid too high to reduce noise.
- Keep exposure times short enough to prevent star trails caused by Earth’s rotation, unless intentionally aiming for star trails.
- Use a sturdy tripod to avoid vibrations during long exposures.
3. Implement Light Pollution Filters
Filters can significantly improve your results. Light pollution suppression filters, such as broadband or narrowband filters, block common light pollution wavelengths. These filters help increase the contrast of stars and nebulae, making faint constellations more visible. When selecting filters, consider your target objects and camera compatibility.
4. Focus Carefully and Use Calibration Techniques
Achieving sharp focus is vital. Use live view with magnification to focus precisely on a bright star or planet. Take multiple exposures and use stacking software to combine images, which enhances signal and reduces noise. Calibration frames like darks, flats, and biases help correct sensor artifacts and uneven illumination.
5. Post-Processing to Bring Out Faint Stars
Post-processing is essential. Use astrophotography software such as DeepSkyStacker or PixInsight to stack images, increase contrast, and accentuate faint stars. Adjust levels and curves carefully to enhance the visibility of the zodiac pattern without overdoing it. Remember, subtle enhancements often produce the most natural-looking results.
Techniques and Common Mistakes in Zodiac Constellation Astrophotography
| Technique | Mistake to Avoid |
|---|---|
| Using light pollution filters effectively | Relying solely on filters without proper focusing or stacking |
| Tracking the sky to reduce star trails | Forgetting to calibrate or align your mount properly |
| Stacking multiple exposures | Over-processing, which creates unnatural images |
| Shooting during optimal times (moonless nights) | Shooting under bright moonlight or during twilight |
“Patience and experimentation are part of the process. Light pollution can be managed with the right tools and techniques, but consistent practice helps you understand your skies better,” advises astrophotographer Lisa McIntosh.
Additional Tips for Urban and Suburban Zodiac Photography
- Plan your shot: Use planetarium apps or sky maps to locate the zodiac constellations and plan your framing.
- Use a remote shutter or intervalometer: This minimizes vibrations and allows for longer, uninterrupted exposures.
- Experiment with exposure times: Shorter exposures prevent star trails but may require stacking to reveal faint stars.
- Consider light pollution maps: Tools like the Dark Site Finder can help identify the darkest spots in your area.
Mistakes to Watch Out For
| Technique | Common Mistake |
|---|---|
| Ignoring sky conditions | Shooting on nights with high moonlight or cloud cover |
| Over-relying on high ISO | Introducing excessive noise and losing detail |
| Not calibrating images | Failing to use dark, flat, or bias frames for processing |
| Underestimating post-processing | Making adjustments that look unnatural or overdone |
Capturing the Zodiac from Your Suburban Observatory
Even in a heavily light-polluted environment, you can succeed by adopting a systematic approach. Start by researching your local sky conditions and planning sessions during the darkest nights. Use filters to suppress unwanted light and stack multiple images to improve your signal-to-noise ratio. Patience pays off, and over time, your images will reveal the familiar shapes of the zodiac constellations.
Final Words on Urban Zodiac Astrophotography
Achieving stunning zodiac constellation photos from a light-polluted setup is entirely possible with the right mindset and techniques. Focus on controlling your environment as much as possible, utilize the proper equipment, and process your images carefully. Remember that every night under the sky is a chance to learn and improve. With persistence, you can capture the celestial patterns that have fascinated humans for centuries, right from your own backyard.
Embracing the Stars in Your Neighborhood
Your suburban skies may be brighter, but they still hold many secrets. Every night offers an opportunity to refine your skills and discover new details. Keep experimenting with different settings, filters, and processing methods. The beauty of zodiac constellations is timeless, and with a little effort, they can shine through even the brightest city glow. Happy shooting!
Post Comment