7 Tips to Prevent Dew and Frost on Your All-Sky Camera Lens in 2026
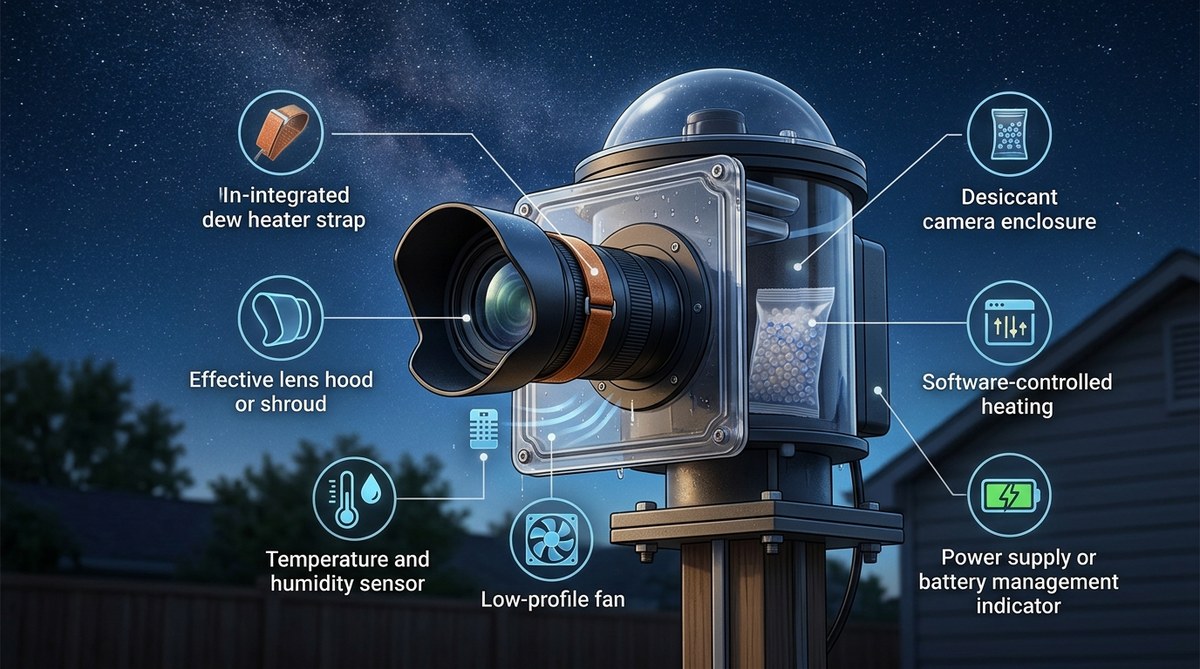
You set up your all-sky camera, dialed in the focus, and waited for darkness. The first few hours of the night are beautiful. Then, around 2 a.m., the lens fogs over. The stars turn into soft blobs. A meteor could streak right through the frame and you would miss it entirely. This is the reality of unattended night sky imaging. Dew and frost are the biggest enemies of an all-sky camera, and they strike when you are asleep. The good news is that you can stop them with the right strategy.
To prevent dew on all-sky camera lens, you need a combination of passive and active methods. A dew shield blocks radiative cooling, a gentle heater raises the glass temperature above the dew point, and hydrophobic coatings repel moisture. Automating these systems ensures your camera stays clear through the coldest, dampest nights without you having to step outside.
Why Dew Forms on Your Camera Lens at Night
Dew happens when the surface of your lens gets colder than the surrounding air. On a clear night, the glass radiates heat into space. This is called radiative cooling. The lens temperature drops below the dew point, and moisture in the air condenses onto the glass. Frost is just dew that freezes.
All-sky cameras are especially vulnerable because they point straight up. They have a wide, exposed dome that sees the cold sky directly. The problem gets worse in spring and fall when nights are cool and humidity is high. In winter, frost becomes the main threat.
Understanding this physics is the first step. You cannot stop the air from holding moisture, but you can control the temperature of your lens.
The 7 Best Ways to Prevent Dew on All-Sky Camera Lens
Here is a practical list of techniques. You do not need to use all of them. Pick the ones that fit your setup and your climate.
-
Install a passive dew shield. A simple tube or hood around the lens blocks the lens from seeing the cold sky directly. This reduces radiative cooling. Even a short shield made from a plastic cup or a 3D printed ring can make a big difference.
-
Apply a hydrophobic coating. Products like Rain-X or dedicated lens coatings cause water to bead up and roll off. This does not stop condensation from forming, but it keeps the droplets small and clear. You can still get an image through a beaded lens. A fogged lens is useless.
-
Use a low power dew heater. A resistor ring or a strip heater wrapped around the lens barrel warms the glass just a few degrees above the ambient temperature. You do not need much heat. A 5 to 10 watt heater is often enough for a small all-sky camera dome.
-
Vent the enclosure properly. If your camera sits inside a sealed housing, moisture can get trapped. Add a small vent with a desiccant filter. This lets the housing breathe without letting in liquid water.
-
Run the camera warm from the start. Some cameras generate their own heat. If yours does not, a small LED or a power resistor inside the housing can raise the internal temperature. Keep it just a few degrees above the outside air.
-
Schedule a pre-warm cycle. Before the dew point hits, turn on your heater or internal warm up for 15 minutes. This raises the lens temperature before moisture can settle. Automate this with a simple timer or a weather script.
-
Monitor humidity and dew point remotely. A cheap temperature and humidity sensor connected to your observatory computer can trigger an alert or a heater. When the lens temperature gets within 5 degrees of the dew point, the system kicks on.
Passive vs. Active: Choosing Your Strategy
Some methods work without power. Others need electricity. Here is how they compare.
| Technique | Power Needed | Complexity | Effectiveness |
|---|---|---|---|
| Dew shield | None | Low | Moderate |
| Hydrophobic coating | None | Low | Low to moderate |
| Passive venting | None | Low | Low |
| Dew heater strip | 5 to 15 watts | Medium | High |
| Internal enclosure heater | 10 to 20 watts | Medium | High |
| Automated dew point trigger | 5 to 15 watts | High | Very high |
A passive shield is the cheapest fix. It costs almost nothing and requires no wiring. But in high humidity, it may not be enough. An active heater is more reliable. The trade off is that you need to run a power cable and control the heat.
Common Mistakes That Ruin Your Night
Even experienced astrophotographers make these errors. Avoid them.
-
Heating the lens too much. Too much heat creates thermal currents in the air above the dome. This distorts the image and can cause blurring. A gentle warmth is all you need.
-
Sealing the housing completely. A tight seal traps moisture from the day. When the temperature drops at night, that moisture condenses on the inside of the dome. Always include a vent or a desiccant pack.
-
Ignoring the camera body. The lens is not the only cold surface. The camera body and the mounting bracket can also collect dew. If the body is wet, the lens will follow. Keep the whole assembly dry.
-
Waiting until you see fog. By the time you notice dew on a live feed, the damage is done. Prevention must run automatically. Do not rely on checking in manually at midnight.
Build Your Own Dew Heater Controller
If you enjoy DIY projects, a simple controller is easy to build. You need a temperature sensor, a relay, and a low wattage heater. A Raspberry Pi or an Arduino can read the sensor and turn the heater on when the lens temperature drops near the dew point.
Here is the basic logic:
- Read the ambient temperature and humidity.
- Calculate the dew point using a standard formula.
- Compare the lens temperature to the dew point.
- If the lens is within 5 degrees, turn on the heater.
- Turn off the heater when the lens warms up by 3 degrees.
This is the same approach used in commercial observatory controllers. You can build one for under $50. For a complete walkthrough, check our guide on building a dew heater controller that actually works.
“I used to lose half my nights to fogged lenses. A simple resistor heater and a humidity sensor changed everything. Now my camera runs clear from dusk to dawn.”
Fairless Hills Observatory operator, 2026
When to Use Each Method for the Best Results
Different seasons call for different tactics. Here is a quick breakdown.
-
Spring and fall (high humidity, moderate cold): Use a dew shield plus a low power heater. The shield handles most of the radiative cooling. The heater covers the edge cases.
-
Winter (dry air, extreme cold): Frost is the main concern. Use a heater with enough power to keep the lens above freezing. A hydrophobic coating helps prevent ice from sticking.
-
Summer (warm nights, occasional fog): A passive shield is usually enough. If you live in a coastal area with persistent fog, add a heater set to a very low power level.
-
Year round automated operation: Combine a dew shield, a heater, and a humidity sensor. Automate the heater trigger with a script. This is the set and forget approach.
Equipment and Tools You Will Need
You probably already have most of these items.
- A dew shield (buy one or 3D print one)
- A resistor heater or a commercial dew heater band
- A temperature and humidity sensor (DHT22 or BME280 work well)
- A microcontroller or a small computer (Raspberry Pi, Arduino)
- A relay or a solid state switch
- A hydrophobic spray (Rain-X or a camera specific product)
- Cable ties and heat shrink tubing
If you are building a new system from scratch, start with our guide on building an all-sky camera system to monitor celestial patterns year-round. It covers the full setup from the ground up.
Keep Your Lens Clear and Your Data Clean
Dew and frost are frustrating. They turn a perfect night of imaging into wasted time. But they are also predictable. You know when they will happen. You know why they happen. And now you have a set of tools to stop them.
Start with the simplest fix. Add a dew shield. If that works, you are done. If not, add a heater. If you still have trouble, automate the whole thing with a sensor and a relay. Each step adds reliability.
Your all-sky camera is a workhorse. It captures meteors, auroras, and the slow dance of the stars. Do not let a little moisture steal those images. A small investment in dew prevention will pay for itself in the first clear night you capture something amazing.
For more ideas on getting the most out of your remote observatory, read about 5 unexpected meteor shower captures our all-sky camera recorded this year. You will see what is possible when your lens stays dry.

Post Comment